In flutter when it comes to the popup menu, flutter provides the PopupMenuButton for creating a popup menu with some option but somewhere it has restrictions in padding and other fields so we are unable to get our desired design of Popup Menu, we have also faced some issues when we were using PopupMenuButton provided by the flutter, so we have decided to create a custom Popup menu with fully customisable functionality.
For a custom Popup menu all you have to do is dealing with the AnimationController, _overlayBuilder, and the design which you wanted to use. So let’s begin with the code.
All first you need to initialize the AnimationController to animate the popup window and a GlobalKey and some required variables.
late GlobalKey _key;
bool isMenuOpen = false;
late Offset buttonPosition;
late Size buttonSize;
late OverlayEntry _overlayEntry;
late OverlayEntry _overlayEntry1;
late AnimationController _animationController;
After initializing the variables define the AnimationController and the GlobalKey in your initState as below.
_animationController = AnimationController(vsync: this, duration: Duration(milliseconds: 250),);
_key = LabeledGlobalKey(“popup-button”);
After defining the above variables you can start with your custom design, this is fully up to you how would you want to show your button, so below code is for the button which used to show the popup menu write this code inside your build function.
Container(
key: _key,
child: GestureDetector(
onTap: ()=>{
if (isMenuOpen) {
closeMenu() //defined below
} else {
openMenu() //defined below
}},
child:
// You can use your custom design below
Text(
widget.text,
style: TextStyle(fontFamily: “Raleway”, color: Colors.black.withOpacity(0.5),),
),
),
);
Now it’s turn to create the layout of the popup menu it will show the option to choose and you can provide the functionality on the click of these options, so for that we will create a _overlayEntryBuilder as below you are free to change the layout as per your requirement.
OverlayEntry _overlayEntryBuilder() {
return OverlayEntry(
builder: (context) {
return Positioned(
// here you can change the position of your popup window
top: buttonPosition.dy + buttonSize.height,
left: buttonPosition.dx,
child: Container(
decoration: BoxDecoration(
borderRadius: BorderRadius.all(Radius.circular(6)),
color: Colors.black,
),
child: Material(
color: Colors.transparent,
child: Column(
mainAxisSize: MainAxisSize.min,
children: List.generate(widget.items.length, (index) {
return GestureDetector(
onTap: () {
//here you can put you action on click
closeMenu();
},
child: Container(
alignment: Alignment.centerLeft,
padding: EdgeInsets.symmetric(horizontal: 10),
color: index == widget.selectedIndex ? Colors.white.withOpacity(0.3): null,
child: Container(
alignment: Alignment.centerLeft,
padding: EdgeInsets.symmetric(vertical: 5),
child: Text(widget.items[index], style: TextStyle(color: index == widget.selectedIndex ? Colors.white : Colors.white.withOpacity(0.3), fontFamily: ‘Raleway’, fontSize: 16,))
),
),
);
}),
),
),
),
);
},
);
}
We will also create one more _overlayEntryBuilder to hide the popup window on click on outer region, if you do not want to hide your popup menu on click of outer region then you can skip this code.
OverlayEntry _overlayEntryBuilder1() {
return OverlayEntry(
builder: (context) {
return GestureDetector(
onTap: ()=>{closeMenu()},
child: Container(
height: MediaQuery.of(context).size.height,
width: MediaQuery.of(context).size.width,
color: Colors.transparent,
),
);
},
);
}
Now a little thing is remaining, which is controlling the popup window with the click of the button. So let’s do that and complete our code.
Dispose of the animation on changing the screen.
@override
void dispose() {
_animationController.dispose();
super.dispose();
}
Find the button position to show the popup window accordingly.
findButton() {
RenderBox? renderBox = _key.currentContext!.findRenderObject() as RenderBox?;
buttonSize = renderBox!.size;
buttonPosition = renderBox.localToGlobal(Offset.zero);
}
Create function to open the window
openMenu() {
findButton();
_animationController.forward();
_overlayEntry = _overlayEntryBuilder();
_overlayEntry1 = _overlayEntryBuilder1();
Overlay.of(context)!.insert(_overlayEntry1);
Overlay.of(context)!.insert(_overlayEntry);
isMenuOpen = !isMenuOpen;
}
Create function to close the window.
closeMenu() {
_overlayEntry.remove();
_overlayEntry1.remove();
_animationController.reverse();
isMenuOpen = !isMenuOpen;
}
That’s it for creating a custom Popup Menu, Your custom Popup menu is ready to use in your application.
if you wanted to make it as a common widget to use in your app where-ever you want then follow the few points listed below
- Create a dart file with the name customPopupMenu.
- Copy the below code and paste in you newly created file
import ‘package:flutter/material.dart’;
class CustomPopupMenu extends StatefulWidget {
final List<String> items;
final ValueChanged<int> onChange;
final String text;
final int selectedIndex;
const CustomPopupMenu({
required this.items,
required this.onChange,
required this.text,
this.selectedIndex = 0,
});
@override
_CustomPopupMenuState createState() => _CustomPopupMenuState();
}
class _CustomPopupMenuState extends State<CustomPopupMenu>
with SingleTickerProviderStateMixin {
late GlobalKey _key;
bool isMenuOpen = false;
late Offset buttonPosition;
late Size buttonSize;
late OverlayEntry _overlayEntry;
late OverlayEntry _overlayEntry1;
late AnimationController _animationController;
@override
void initState() {
_animationController = AnimationController(vsync: this, duration: Duration(milliseconds: 250),);
_key = LabeledGlobalKey(“popup-button”);
super.initState();
}
@override
void dispose() {
_animationController.dispose();
super.dispose();
}
findButton() {
RenderBox? renderBox = _key.currentContext!.findRenderObject() as RenderBox?;
buttonSize = renderBox!.size;
buttonPosition = renderBox.localToGlobal(Offset.zero);
}
closeMenu() {
_overlayEntry.remove();
_overlayEntry1.remove();
_animationController.reverse();
isMenuOpen = !isMenuOpen;
}
openMenu() {
findButton();
_animationController.forward();
_overlayEntry = _overlayEntryBuilder();
_overlayEntry1 = _overlayEntryBuilder1();
Overlay.of(context)!.insert(_overlayEntry1);
Overlay.of(context)!.insert(_overlayEntry);
isMenuOpen = !isMenuOpen;
}
@override
Widget build(BuildContext context) {
return Container(
key: _key,
child: GestureDetector(
onTap: ()=>{
if (isMenuOpen) {
closeMenu()
} else {
openMenu()
}},
child:
// You can use your custom design below
Text(
widget.text,
style: TextStyle(fontFamily: “Raleway”, color: Colors.black.withOpacity(0.5),),
),
),
);
}
OverlayEntry _overlayEntryBuilder() {
return OverlayEntry(
builder: (context) {
return Positioned(
top: buttonPosition.dy + buttonSize.height,
left: buttonPosition.dx,
child: Container(
decoration: BoxDecoration(
borderRadius: BorderRadius.all(Radius.circular(6)),
color: Colors.black,
),
child: Material(
color: Colors.transparent,
child: Column(
mainAxisSize: MainAxisSize.min,
children: List.generate(widget.items.length, (index) {
return GestureDetector(
onTap: () {
widget.onChange(index);
closeMenu();
},
child: Container(
alignment: Alignment.centerLeft,
padding: EdgeInsets.symmetric(horizontal: 10),
color: index == widget.selectedIndex ? Colors.white.withOpacity(0.3): null,
child: Container(
alignment: Alignment.centerLeft,
padding: EdgeInsets.symmetric(vertical: 5),
child: Text(widget.items[index], style: TextStyle(color: index == widget.selectedIndex ? Colors.white : Colors.white.withOpacity(0.3), fontFamily: ‘Raleway’, fontSize: 16,))
),
),
);
}),
),
),
),
);
},
);
}
OverlayEntry _overlayEntryBuilder1() {
return OverlayEntry(
builder: (context) {
return GestureDetector(
onTap: ()=>{closeMenu()},
child: Container(
height: MediaQuery.of(context).size.height,
width: MediaQuery.of(context).size.width,
color: Colors.transparent,
),
);
},
);
}
}
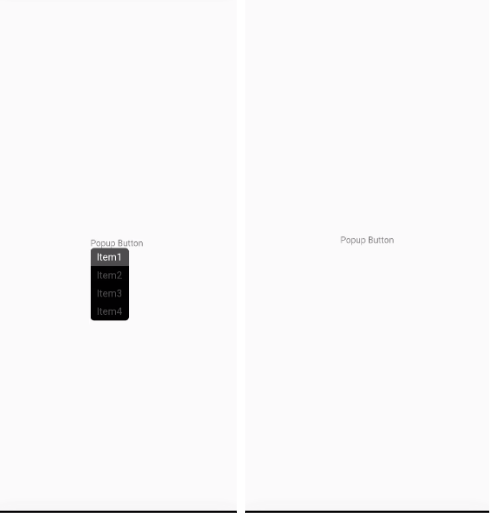
- Copy and paste the following code where you want to show you menu button
CustomPopupMenu(
items: [“Item1”, “Item2”, “Item3”, “Item4”],
onChange: (index){
setState(() {
selectedIndex = index; //saving the selected index into as variable named selectedIndex
//here you can put your action on click of item
});
},
text: “Popup Button”,
selectedIndex: selectedIndex, //provide the index of selected item to highlight that
),
That’s it for the custom Popup Menu, you can use it as you want, if you have any query regarding this feel free to ask.
Related Posts...
Mobile AppsTechnologiesWhat is New!What's Hot
Jul 7th, 2026
The rapid growth of digital payments has transformed how businesses and consumers manage financial transactions. Whether you’re ordering food, shopping online, paying utility bills, or transferring money internationally, secure digital […]
Read more
Jun 2nd, 2026
Artificial Intelligence has evolved from a futuristic concept into a powerful business tool. In 2026, organisations across industries are leveraging AI to automate workflows, enhance customer experiences, improve decision-making, and […]
Read more
May 28th, 2026
In early 2026, Microsoft made a surprising move that sent ripples through the tech industry—the company began canceling Claude Code licenses for most of its direct employees. Just six months […]
Read more