Swift is a new programming language that is purely compatible with objective C. This makes it possible to use objective C file code in Swift file. Apple claims the co-existence of Swift and Objective C in an application but, this does not relate to re-using old classes made in Objective-C whilst building new classes in Swift. The reason being as Objective-C is a platform-independent language unlike Swift is platform-dependent. Now, implementing non-platform-dependent code in Swift won’t be fruitful. henceforth, writing platform dependent code in Swift would be absolutely fine.
Step 1: Addition of Objective-C
Add a .m file in your class and give it a name CustomObject.m.
Step 2: Addition of Bridging Header
While adding .m file it is quite likely you be prompted with something like this below:
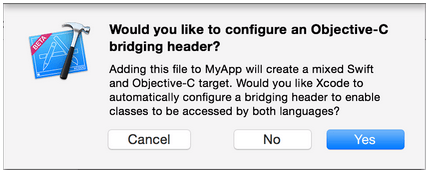
image credit: stackoverflow
Simply click on YES !
In case you are not prompted or have unknowingly removed your bridging header then add a new .h file in your projecr and name it as <#YourProjectName#>-Bridging-Header.h.
In some rare case while working with Objective-C frameworks if you forget to add an Objective-C class explicitly and Xcode is unable to find the linker. Then, create your .h file named as mentioned above and ensure to link its path in your target’s project settings like below:
image credit: stackoverflow
It is a smart approach to link your project using $(SRCROOT) macro such that in case you want to move your project or work over it including others using remote repository it will work fine. $(SRCROOT) can be viewed as a directory that holds your xcodeproj file that look like below:
$(SRCROOT)/Folder/Folder/<#YourProjectName#>-Bridging-Header.h
Step 3: Addition of Objective-C Header — .h
Add another .h file and name it as CustomObject.h.
Step 4: Build your Objective-C Class
In CustomObject.h
#import <Foundation/Foundation.h>
@interface CustomObject : NSObject
@property (strong, nonatomic) id someProperty;
– (void) someMethod;
@end
In CustomObject.m
#import “CustomObject.h”
@implementation CustomObject
– (void) someMethod {
NSLog(@”SomeMethod Ran”);
}
@end
Step 5: Adding Class to Bridging-Header
In YourProject-Bridging-Header.h:
#import “CustomObject.h”
Step 6: Use your Object
In SomeSwiftFile.swift:
var instanceOfCustomObject: CustomObject = CustomObject()
instanceOfCustomObject.someProperty = “Hello World”
println(instanceOfCustomObject.someProperty)
instanceOfCustomObject.someMethod()
More ever there is no actual need to import explicitly as that is what the bridging header is for. Looking forward to respond to your queries and comments regarding code i have discussed for calling Objective C code using Swift.
About Singsys Pte. Ltd. Singsys is a solution provider that offer user friendly solution on cutting edge technologies to engage customers and boost your brand online results from a set of certified developers, designers who prefer optimized utilization of the available resources to align client’s idea with their skillset to reflect it into a Mobile application, Web application or an E-commerce solution
You may be interested in following:
- Right Approach to interact Objective-C Classes in CocoaScript
Related Posts...
Objective CSwift
Dec 25th, 2023
Introduction to Swift Programming Language Swift, the brainchild of Apple Inc., emerges as a robust, multi-paradigm, and versatile programming language. Tailored for developing applications across iOS, macOS, watchOS, and tvOS […]
Read more
Dec 29th, 2021
Swift UI is a UI toolkit that allows us to design applications in a declarative manner. Swift UI assists you with building incredible-looking applications across all Apple platforms with the […]
Read more
Jun 14th, 2019
“To thrive in this new age of hyper-change and growing uncertainty, it is now imperative to learn a new competency – how to accurately anticipate the future.”— Daniel Burrus […]
Read more