We use Maps to find places and directions. The MapKit framework makes it easy for developers to create custom annotation view to implement applications which can make use of the maps in the applications. To create a custom annotation view over map view using Mapkit framework just follow these simple steps.
Step 1- While adding annotation don’t give its title and subtitle. Just add it with Latitude / Longitude and take an integer variable that starts with 100(so that its tag do not clash with others) and increases as per the loop for adding notation.
annotationTag = 100;
annotationPoint.coordinate = loc;
[mapViewHuanBao addAnnotation:annotationPoint];
annotationTag++;
} Step 2- When you add a notation this will call an MKMapViewDelegate function, just set a tag of that notation.
In indexOfTheObject you will get the notation tag.
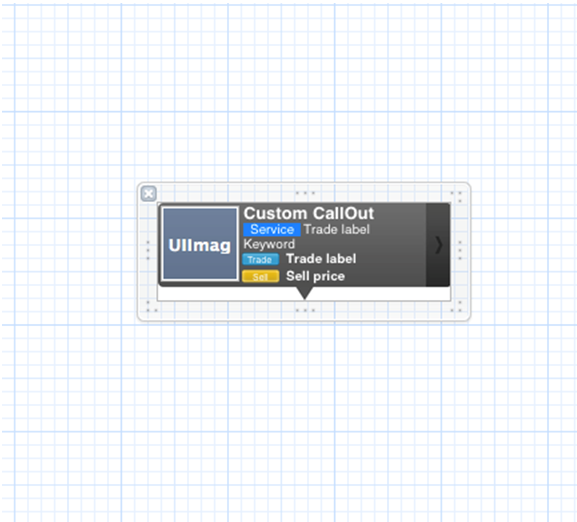
Step 4- Now create a custom view as per your requirement, and give tag to every property you used in that view. We used callout view name as calloutView. Set its file owner to your view controller.
Step 5- After finding the tag of selected notation, just use following method to create a custom call out view.
UILabel *nameLbl = (UILabel *)[annotationView2 viewWithTag:[here give ur tag which u set in custom view]];
And so on….
Step 6-Finally just add it to the view.
[view addSubview:annotationView2];
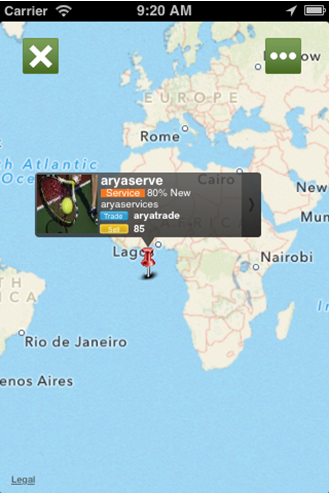
You can also navigate it to its detail but for that you have to add it on map view, because when you are adding it on view it will remove it from view, so the object is DE allocated.
Mobile apps play a vital role in how retail businesses connect with customers. Leading retailers like Best Buy have successfully built powerful mobile applications that allow users to browse products, […]
Technology continues to evolve rapidly, transforming industries, businesses, and everyday life. From artificial intelligence to advanced cybersecurity, the coming years will bring innovations that reshape how organisations operate and how […]
The food industry is evolving faster than ever. With rising digital adoption, on-demand culture, and shifting consumer behaviour, the cloud kitchen business model is becoming a dominant force in 2026. […]